Wednesday, 16 November 2016

Pampered Kitty Cats

So now that things have settled in our new Kitty Cat home, we missed having our kitty with us. He is currently nicely settled with Grandma, so rather than stress him out with a series of long, lonely flights from Australia, we decided to adopt a pair of kittens from a local animal shelter.They are brothers from the same litter and very handsome tuxedo cats.
And, being a crafty, crazy cat lady, I designed a new Cozy Cat Bed for them to sleep in. It is completely made from fabric. The design allows the sides of the Cozy Cat Bed to squash as Kitty Cat plays on it and then they spring back when he wants to snuggle down for a nap. The pattern is now available in my Craftsy Store. Even though the name is Cozy Cat Bed, it would be a great bed for small dogs too.

 Now that the Kitty Cats have a nice new bed, I looked at the fabric scraps on my table and decided to make them a new toy or two. So let's make a fabric mouse for the Kitty Cats to chase.

These little guys are easy to make. You will need:
Scraps of Quilting Cotton 
Rotary Cutter
Cutting Mat
Template for Cutting Circles
Strong Thread
Wool Yarn
Toy Filling
Pins
Hand Sewing Needles

Step 1:
Cut a 1/4 circle from your fabrics. I started with a 4 inch square of the floral print and a 2 1/2 inch square of the purple print. I used the Phillips Fiber Art Cut-A-Round to cut the 1/4 circle from each fabric.
Although, I have the mini version of this tool.


 Step 2:
Pin the two straight edges together, right sides in.


Step 3:
Stitch this edge with a 1/4 inch seam. You can stitch by hand or machine.


Step 4:
Turn the mouse body right side out. The narrow point will be the mouse's nose. Use a blunt object like a pencil to push the nose out.


Step 5:
Thread a hand sewing needle with a double thread and stitch a gathering stitch around the open edge of the mouse.


Step 6:
Fill the mouse firmly with toy filling.


Step 7:
Cut 3 lengths of Wool Yarn for each tail. I cut the Wool Yarn 6 inches long for the small purple mouse and 8 inches long for the larger floral print mouse.
Tie the 3 lengths of yarn together with a knot and then plait them. Finish the plait with a secure knot.


Step 8:
Pull the gathering thread stitched in step 5, until the back of the body is almost closed.


Step 9:
Insert the tail through the opening and pull the thread up firmly. Stitch through the tail and the fabric several times to secure the tail. End off the thread.


If you wish, you can embroider some eyes on the mouse. As you can see, I left the mouse plain. I am impatient to see how Kitty Cat likes them!
I think from the photo below, that Kitty Cat likes his new mouse toy!


Monday, 31 October 2016

My Favourite Tools - Foundation Piecing

The last few weeks have seen me working on a foundation pieced border for this seasonal wall hanging:
https://www.craftsy.com/quilting/patterns/kitty-cat-at-halloween/462288
 Just in time for Halloween the pattern is now available in my Craftsy Pattern Store. Well, to be honest, not quite released in time to make it for this Halloween, but I have heard a little rumour that there will be another Halloween next year :)

The outer 2 borders on this wall hanging are created with Foundation Piecing, also called Paper Pieceing. For a while, I wasn't a fan of this technique. I loved the amazing, perfectly pieced quilts that I saw others make with Foundation Piecing, but when I tried it, I found it fiddly and my fabric pieces would not cover the areas that they were supposed to cover!

A kind friend gave me some tips and around the same time, I attended a new product talk at my (then) local sewing shop. A few new tools came home with me and suddenly my Foundation Pieced projects started to play nice.

So these are some of my favourite tools for when I am Foundation Piecing.


Olfa Rotating Cutting Mat:
I use the smaller 12 inch size, but both are great to use. The motion of the mat is smooth and I can place my foundation and trim it as needed without wishing for extra motion in my wrists.

Clover Hera:
This little tool is actually designed for marking fabric and I do use it for that as well. When I am Foundation Piecing, I use my Clover Hera to score my Foundation Patterns so that they fold exactly on the stitching line.

 This step is important for accuracy when I use the next tool.

Add-A-Quarter Ruler:
This is the tool that changed my relationship with the Foundation Piecing technique. I use the Add-A-Quarter Ruler to trim the seam allowance to 1/4 inch, just before I add the next piece of fabric.
Then the next piece of fabric is placed right sides together with the raw edges even. It is easy to pin the fabrics to the Foundation Pattern, flip the new fabric and check that it will cover the next section. So much easier than the way that I originally worked.

28mm Rotary Cutter:
I like to use this smaller than normal rotary cutter for working with the small pieces in Foundation Piecing. I feel that I have more control over the cutting and less chance of cutting myself in the process. I also like that the safety cover for the blade is always present. It just moves aside with the pressure used when cutting.

Now that I am feeling inspired by my most recent Foundation Pieced border, I am working on a couple of Foundation Pieced ornaments, just for Christmas! More details soon.


Friday, 7 October 2016

What Bathurst means to me

So, in addition to my adiction to crafty pursuits, I am a very passionate follower of the V8 Supercars car racing category. This coming weekend is the most important race of the season, the Bathurst 1000 at Mt Panorama. I. Love. This. Race.
How much, you may wonder.
I have watched every race since 1978.
I have watched them all live, getting up at 4am Perth time to watch the start of the Sunday telecast.
My friends know that I will not go to any other event over this weekend.
I have taken leave from work so that I can watch this race.
When I visited Sydney in 2004, I drove out to Bathurst just so that I could see and drive around the track.


This year is a special one, celebrating 10 years of the Peter Brock Trophy and celebrating the life of the man who has won more Bathurst  races than any other driver. So as everyone connected with the race is sharing their special memories of Bathurst 2006, I thought that I would share mine.

So for me, 2006 was a difficult year. My Dad was sick and in May of 2006 we lost him. Even though I knew it was coming, I was devastated. We watched car racing together and we worked on cars together. My Dad taught me to love and care for my cars and that was great. My cars have always been very close friends. They were not special vehicles in anyone elses eyes, but to me they were very special. I have loved them all. Thank you Dad.

In July, I lost my job. I was told that it was not me, they were very happy with my work, but the area that I was working in was not economically viable and that was that.

And then in September of 2006, I lost my hero, the driver I had followed since I had first heard of this race just before the 1978 Bathurst. Peter Brock was special to our family. He was the man we had seen drive all day and win the race by miles. He always had something to say to the fans. His final accident was in my home state in Australia, not far from where I lived, so like many Perth-based fans, I went there and saw the tributes to the man we all loved.


October 2006, I wasn't sure if I could even bear to watch the race. I was hurting so much from everything that had happened. It would be the first time that I had watched the race on my own. I would not have my usual after-race analysis with my Dad. In the end I just could not bear to be away from the cars. I watched the build up and was cheered up somewhat when Mark Skaife was fasted in the shoot-out and put his car on pole. I loved the tributes to Peter Brock on the day and the respect that was shown. Then the race started and Mark Skaife's car was involved in an accident on Mountain Straight which put him out of the race. He was the active driver I was following in the series at the time. At this point, I just couldn't keep on coping and sat there in front of the tv in tears for the next hour.

At the end of the day, I was conflicted. I was happy that Craig Lowndes had won the race. I had a fair idea of what it meant to him. But as a very one-eyed Holden girl, I was just upset that he had done it in a Falcon. Brock was a Holden man, we were a Holden family.

Since then I have followed every race in each season in honor of my Dad and the love he taught me for cars. I cheer on the close racing and the clean passes and wince every time a car is hurt. I hold my breath every time there is a crash, hoping the driver is OK and feeling upset over the damage to the cars, because to me, these beauties are alive too and hitting the concrete like that has to hurt.

So this year in honor of 2006, my Dad and Peter Brock, I will once again be in front of the tv, on the edge of my seat, shouting advice to drivers who can't hear me. I wish for a good race, a clean race, a great race. And this year, between the support races, I will finally cast on for my Holden shawl. Yes I know that the designer did not make this in honor of my favourite cars. I am sure that she doesn't even know that Holden cars exist. But I do and I have some red yarn. And some day soon I will have a photo of my Holden shawl on my Holden car, when I get to see her next. So please to everyone who is entered in The Great Race, good luck, race well and I hope a Holden wins! 

Thursday, 22 September 2016

Time for an Update

Wow, it has been such a long time since I posted an update here. 2016 has been a bit of a whirlwind here at the Kitty Cat house. There was the big move in March from Western Australia
 to Seattle in the USA.
Such an exciting place to be and so many changes to get used to. The biggest ones for me so far have been driving on the other side of the road, which was terrifying at first and cars that stop for pedestrians! So far, I am finding Seattle to be a lovely city with inspiration in so many random locations. A pretty garden around one corner, a lovely gate around another and awesome artworks in unexpected places. Now that I have had a chance to draw breath, I am finding myself inspired to sew and create again. I bought some craft projects with me from Australia and have been working on a few new designs too.
So far, I have made some shawls,

seen some awesome scenery,

embroidered and appliqued some blocks for three ongoing quilts,

driven across the border into a different country (a great novelty for someone from Australia!),

designed some new patterns for my Craftsy Pattern Store,

climbed a mountain (well part of it anyway),
caught some Pokemon

and completed some small projects
As you can see, Seattle is keeping me busy. Now that I am getting more organized, I will have more to add here soon...

Friday, 26 February 2016

New Patterns!

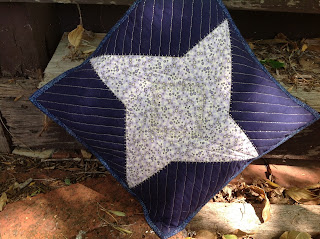
Hi all. Today I have three new patterns that I recently uploaded to my Craftsy store. They are two cushions and a patchwork block holder. Firstly the cushions. Twinkle Twinkle is a simple cushion based on the classic Friendship star block. Using fabrics that contrast strongly to each other and then quilting the cushion with metallic threads really makes the design sing. There are tips on quilting with metallic threads in the pattern and also in this blog post.

The second cushion pattern is one just for the girly girls!  The Simply Chic Cushion combines lace, beads and easy piecing in one pretty project. The piecing is easy enough for this to be the first project for a beginner and the entire project could be made in an afternoon. A great project to introduce that special girl to the joy of sewing.
 The third pattern is a handy item for any quilter. The Patchwork Block Book is designed to hold your completed patchwork blocks for your current work in progress. It is very handy for storing the completed blocks of a block of the month project. The Patchwork Block Book keeps the blocks flat and all in one place while you work on the current month's block. My version of the block book has kept the blocks I use for my sampler class flat and safe for the last few years!


When open, the Patchwork Block Book has a pocket for your project notes or pattern and triangular flaps to keep your patchwork blocks flat against the inside of the book.
 The Patchwork Block Book is designed to hold blocks up to 12 1/2 inches x 12 1/2 inches.

I hope I have a pattern here that is just right for your sewing needs. If you have made a project from one of my patterns, please let me know. I love to see photos of works in progress and completed projects.

Friday, 19 February 2016

Quilting With Metallic Threads

Quilting a small project is a great opportunity to try a new technique. I find cushion covers and bag fronts to be a perfect size to try a technique to see if I like it. They are large enough to really get a taste for the technique, but not so large that a tricky technique becomes intimidating. Also at the end of it, you have a finished (or nearly finished) project, not just a box full of samples.

The technique I want to share here is quilting with metallic threads. There are many different metallic threads available, many of which have been developed for the automatic embroidery machines. Metallic threads add a subtle or not so subtle shine to your project, depending on the thread and how much quilting you do. They can be combined with beading for even more bling (but that is a topic for another day).

 I recently quilted the cushion cover shown above (pattern available here) with metallic thread in order to add some pizzazz to a simple pieced block. This is how I did it:

Firstly, I always mark my quilting designs on my quilt top. I use one of the temporary markers (such as this one for dark fabrics) to mark all of my quilting lines on the quilt top. For me this makes the quilting way less stressful. No I don't necessarily stay exactly on the lines, although I do try to stay as close as possible. When I'm done, the lines from this pen are removed with heat or washing. 

For this project, I used a quilter's ruler to mark lines about half an inch apart across the backing, so that the lines radiate out from the star. I then used a different water soluble pen to add quilting lines within the star. I added a diamond to the center of the star and then connected the points of the diamond to the points of the star. 

Once all of the quilting lines are marked, it is time to add the batting and get ready for quilting. I always add a layer of homespun or quilter's muslin beneath the batting. This prevents the batting getting caught in the feed teeth of my sewing machine and provides a nice lining inside the cushion.
For a small project like this cushion cover, I just pin the layers together with regular sewing pins. The sewing pins are easier to insert and remove than safety pins are and in a small project, there is not as much chance of the pin scratching you or falling out.

Next it is time to set up your sewing machine to use the metallic thread. The thread that I used, is cross-wound on the spool. If you look closely at the photo below, you can see that the thread makes "X" patterns up and down the spool.


These threads sew better if they are on the vertical spool pin. This allows the machine to pull them directly off the spool and limits the amount of curling and kinking that the thread can do before it enters the thread path of the sewing machine.
 Other options for positioning the thread are to use the horizontal spool pin (hidden in the recess in the top of the sewing machine shown above) or to use a thread/cone stand behind the machine. When you are using a brand of metallic thread you have not used before, you may need to try a few methods to get the thread flowing smoothly into the machine. Remember, the finished results are worth the extra work of the set-up.
It is also advisable to use a Topstitch 80/12 needle with metallic threads. This is the needle to the left in the photo above. The topstitch needle has a long oval eye when compared to the regular needle shown to the right. The larger eye decreases the friction on the thread as each stitch is made and this helps to limit thread breaks.

The quilting can be done either with the feed teeth engaged and the walking foot fitted or with the feed teeth disengaged and the free-motion/darning foot fitted.

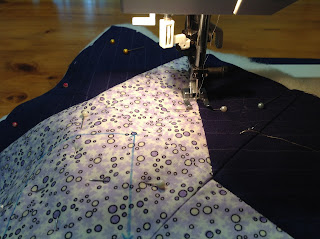
As with a full size quilt, start fairly close to the centre of the project and quilt out to the edges. For the Twinkle Twinkle Cushion,  I started by quilting in the ditch of the star, removing pins as I came up to them. When stitching with a metallic thread, sew at a slow to medium speed. Metallic threads are more delicate than regular sewing or quilting threads and break more easily, especially if you sew fast with them.

 Once I had stitched in the ditch of the star, I then quilted all of the parallel lines on the background fabric. I quilted around the diamond shape in the center of the star with an open decorative stitch like these ones
 
and then added the last few lines joining the diamond to the points of the star with a regular straight stitch. At the end of any line of stitching that wa not going to be caught when the cushion was assembled, I took the threads to the back of the work, knotted them and used a hand sewing needle to pass the ends through the batting in much the same way as you do when hand quilting.

Metallic threads add a great sparkly effect to your quilting, especially on dark fabrics and for Christmas projects. I hope this inspires you to give them a try.


Wednesday, 20 January 2016

Test Knitting

As promised, here is a short note on Test Knitting.

What is it?

Test knitting is one of the final steps in preparing a knitting pattern for sale. It is an opportunity for the designer to see his/her design in different yarns and made by different knitters. Having the pattern knitted by different knitters allows the designer to make the final assessments of their design. Test knitters will generally have some experience at knitting and some will be more experienced than others. Having knitters with a range of experience lets the designer assess if the pattern does suit the level of experience that they designed for. 

As knitting style (English, continental, combination) and yarn hold affect the tension of knitting, having a group of knitters work on the same design shows if or how these variations will affect the size and appearance of the finished design. This also applies to different yarns. The designer will have specified a particular weight of yarn (e.g. Fingering weight) but different fiber types can also have an effect on the finished item. Sometimes the designer will specify a yarn type. For example, in my test of Peacock Butterfly shawl, the designer specified that a 100% merino yarn was to be used. This specification is generally because different fibers behave in different ways. A merino yarn is softer and has more drape than other wool types. Silk, linen and cotton all behave very differently to wool or alpaca yarns. This can affect the drape and fit of the finished item.

  Test knitting is a final opportunity to catch any errors before publication. It allows for more people to check through for any typographical errors, symbols missing from charts or keys and to check the general flow of the pattern makes logical sense and is easy to follow.

Why do it?

For me, test knitting has always been a way of challenging myself and developing as a knitter. The first time I tested, the challenge was "am I good enough to do this". Some of the time the deadline is the challenge. Many of my test knits have introduced me to new techniques or stitches. Another challenge for many knitters is to knit strictly to the pattern.

I only test knit designs that I love and mostly from a few designers whose patterns I have knit in the past. Loving the design makes it much easier to stay motivated and complete the project by the deadline.


Another reason to test knit is to knit with a group. The tests that I have been involved with have all been conducted on Ravelry forums. This means that we see all the shawls in progress and can discuss any issues we are having with interpretation of the pattern and catch any errors more quickly. It is a bit like a virtual knit night, with friends from all around the world.

Test knitting the design means that you are one of the first to knit it. Often the designer will feature photos of your finished project on the Ravelry pattern page for the design and sometimes these photos will be included with the pattern as the stole in the photo below was.


How do you do it?

The test knits that I have been involved in (almost all shawls) have started with the designer posting a request for test knitters, either on a forum or (more rarely) by contacting me directly. Once all of the testers have been selected, the pattern is sent to them. 

After receiving the pattern from the designer, I read through it to check that everything makes sense to me - the "I can knit this" moment. After the design has been set up in my Knit Companion app, I weigh my yarn and set up a project page on Ravelry where I can keep all the records of my test. 

As I progress through the pattern, I keep a record of the size of the item at certain points (such as the end of a chart, before starting the border) and weigh my yarn so that I can calculate exactly how much yarn I have used. After binding off, the item needs to be blocked to the measurements in the pattern (or as close as you can get) and photos taken to be uploaded to the test forum and sent to the designer. 

The designers that I have tested for also have a survey that needs to be completed after the item is finished. This generally requires information on your gauge, yarn brand, type and how much you used, the size of the finished item and any errors, comments or corrections that you have for the pattern.  

So there you have it. I test knit because I love knitting shawls and the designers on Ravelry are coming up with new beautiful designs like the one below at a scary rate.
 

Tuesday, 19 January 2016

Oh Bother - Update

Remember this yarn?
 Well, I competed my test knit (with a few days to spare too!). My felted joins all held up to the stresses of knitting, adding the beads and the wet blocking process. I was quite impressed as I was concerned that one or more would fail during the blocking process and leave a nasty hole in the shawl. So the finished shawl looks like this:

I am really pleased with the results. The yarn seems strong, the colours blend well right through to the almost electric blue that came through during the bind-off and the beads have added sparkle just where I wanted it. The designer likes it too. This is one of those designs that is easy to knit and gives a very "wow" finish. Even though everything worked out well this time, next time I want to knit a gradient shawl, I will look around for one that is already dyed that way and ready to knit with. The only stress then is making sure that you don't run out of yarn before the end of the bind-off.

Coming tomorrow - that promised post on what test knitting is anyway....