Tuesday 8 May 2018

Rest in Peace, Grizzly

The last couple of weeks have been a sad time for us here at Kitty Cat Crafts. Our much loved, beautiful white cat, Grizzly passed away at the age of 18. He had been with us since we adopted him from the Cat Haven as a tiny kitten in 2000. Not just a beautiful cat, he was very curious and a sociable cat, helping me with all of my indoor tasks. He especially liked to be involved in my crafting ventures.

 Grizzly loved to examine all of my quilting projects and would wake up from a nap in time to examine the next step of each project. He was very good at checking how well embellishments were stitched to a quilt or wall hanging. Of course he would "test" my sewing tools and notions any time he got the chance! One of his favourite tricks was to wait until I wasn't looking, jump on my sewing table and push spools of thread onto the floor. Apparently, if you use cat logic, any item that falls on the floor immediately becomes a cat toy.
As many of you will know, no quilt is complete until it has a liberal sprinkling of pet hairs on it. Grizzly loved the feel of quilting cottons and would lie on any fabric or quilt that he could possibly get to, even if it meant that he had to wriggle under the pillows on the spare bed!
As a white cat, he had a very serious duty to sprinkle white hairs on any black fabric that he could find.
His favourite time of year was Christmas. He loved to sit on my Christmas quilt and pretend that he was one of the Christmas ornaments. In addition to this he would spend many hours underneath the Christmas tree, stress testing all of the ornaments. He was always very excited at the beginning of December when the oversize cat toy was set up.

Grizzly was a very important part of our lives and was the inspiration behind the name Kitty Cat Crafts for my pattern line. In 2016 when we had the opportunity to move to the USA, we had to make the difficult decision not to bring him with us as we thought that the long journey and 3 changes of planes would be too stressful for him. He has spent the last 2 years living with my Mum and being very spoiled by his Grandma and Auntie Shanan. I am so sad that I did not have another chance to give him a cuddle before he went. Time was just not on our side. So rest in peace, my dear Kitty Cat and I will sew on in your honor.


Saturday 3 March 2018

A Sense of Accomplisment

A few days ago, I finished the sample and then the pattern for a cute little tote bag. It is my Spring Flowers Shopping Tote and the pattern is now in my Craftsy Store.
This bag brings me so much joy for a few reasons.

The crisp, clear greens and the bright pink are so fresh and happy after the last few months of grey days. Working on the applique in a brightly lit window has been so uplifting for my mood. It has also encouraged me to go for a walk outside and look for all of the hallmarks of the coming Spring. The days are getting longer. Trees now have little leaf buds on them. Bulbs are pushing through the soil in nearby gardens. Some brave Daffodils and Crocus are already in flower.

This is the first applique design that I have worked on in a little while. The design has been completely created in Electric Quilt. I love to work in this software. Spring Flowers Shopping Tote was created in version 7 of Electric Quilt, but version 8 is now available and has even more features than before. Seriously, if you like to design at all, it is a great program to try. I am still learning to use it, but have made some very nice virtual quilts just by following the built in tutorials. Just look at this one:

For me, the greatest joy has come from the fact that my Spring Flowers Shopping Tote is the last of my projects from 2017 that were works in progress at December 31, 2017. In actual fact, there were two projects that I started in 2017 and did not complete in that year. I thought that was a pretty good accomplishment until I realised that I had now finished them both. Of 97 projects started in 2017, I completed 95 of them before the end of the year. The two that were incomplete were my much loved Atlanticus Blanket (completed in January 2018) and my Spring Flowers Shopping Tote.
This is such a great accomplishment for me. I am great at coming up with ideas, selecting and combining materials and even starting projects. Getting them finished is a much more difficult task. This is the first time that I have ever completed all of the projects that I started in one year! The closest that I have come before was 2016 when I had seven projects still in progress by the end of the year. I have since completed five of these and the remaining two I am actively working on. I really like the idea of finishing what I started in the one calendar year, maybe this year I can achieve this..... 
 

Tuesday 13 February 2018

Heart Tree


This past Christmas, I bought a tiny living Cyprus tree to use as a Christmas tree. It is really tiny, only about 18 inches tall and I don't have many decorations made (yet...). So at Christmas, my tiny tree looked like this:
Then when it was time to put the Christmas things away, the poor tree looked very plain. As it is still Winter, I decided to leave all of the crochet snowflakes on the tree.
This made me happy. I think that I will make some more snowflakes ready for next year though. Then, over the last few days, I was browsing Pinterest to find some heart designs to make my little tree a Heart Tree for Valentine's day. As I am enjoying crochet at the moment, I searched for Crochet Hearts and fell down that rabbit hole for a while. I found this cute crochet heart, complete with chart.
In my thread stash, I had these pretty Lizbeth crochet threads in both size 10 and size 20. 
I picked up my trusty crochet hooks, using a size 1.5mm for the size 10 thread.
 And a 1.25mm for the finer size 20 thread.
 The chart was pretty easy for me to figure out and a short time later, I had some pretty hearts.
 They looked pretty good to me straight off the hook, so I didn't block them and wove in the ends to form the hanger. Now they are making my tiny tree pretty!
 Together with the Loving Hearts Door Hanger that I made last year, they are bringing some love and colour to my apartment.


Monday 22 January 2018

2017 Wrap Up

So, 2017 has bid us goodbye. It was a bit of an up and down year for me. In amongst it all, I managed to find some time for crafts. I finished a grand total of 105 craft/sewing projects for the year. This is a record for me! The crafts included ranged from patchwork, sewing, knitting, crochet and even some tatting. My first project was completed on 11 January 2017 and the last one on 28 December 2017.


On working through my list of completed projects, it appears that 2017 was the year of the bag for me.  I started out with the lovely Farmer's Market Gardening Bag completed in March. This bag has become my favorite bag to accompany me to the local library. I ended with the Trick or Treat Bag in October. One of my cats loves this bag almost as much as I do!


During April, I made a collection of drawstring bags, some of which became the samples for my pattern Jelly Roll Jewellery Pouch. The others made from a beautiful Moda Fabrics Jelly Roll have seen a great deal of use as project bags for small knitting projects. 


After an August re-vamp of the cupboard I keep my craft supplies in (yep, they are pretty much all in the cupboard under the stairs), I made 5 pencil case size zipper pouches. I do actually use one for pencils. The others have been used for fabric safe markers, cables for crafting devices, knitting notions and I still have one to spare! 

As with previous years, I knitted a lot this year. In addition to shawls, I made several hats, most of which were used as Christmas gifts, now that we celebrate Christmas at the cold time of year. I completed 11 shawls this year, including 10 by Boo Knits for the 2017 Boo Challenge. The Challenge was a lot of knitting from one designer, but I have lots of her patterns in my pattern stash, so it was a great opportunity to sit and knit them. Some of these shawls have become my go-to shawls to wear with my winter coat. It is amazing how warm a wisp of airy fluff can keep you!


I released a total of 18 patterns this year, my biggest release to date!  I also sold more patterns than I did in 2016, so an enormous Thank You to all who purchased patterns from me.

In October and November, I took part in the on-line class Sulky Art, Fun & Home Fashion On-Line Teacher Certification. It was fun, with great videos and cool projects to make. Making 5 very different projects in 5 weeks became a bit of a challenge for me, when I got inspired by the techniques in this course and started some extra things.... most of which were finished by the end of the year. I still have some more ideas to work with, looking forward to experimenting with these in 2018. 

Overall, 2017 was a great crafting year. I tried some new techniques and some new products. It is always good to learn about something new or to use a tool or product in a different way. This has given me some inspiration to tackle some kits that have been quietly waiting in the corner for my attention. As an added bonus, at the end of 2017, I only had 2 projects that were started in 2017, but not completed. One is an upcoming pattern for a tote bag (soon, I hope) and the other is a beautiful crochet Afghan, Atlanticus designed by Hooked on Sunshine. More on these projects another day..... 

Sunday 29 October 2017

On-Line Classes

Have you ever tried an online class? What did you think?

I have many Craftsy online classes in my library and have picked up tips and learnt new techniques from all that I have watched. My only problem with my Craftsy classes, is making time to watch the class and start the project or try the technique. Maybe I need to add a booking to my calendar each month and work my way through my classes.

In  2014, I found that Craft University also offered online classes. Many were similar to the style of classes offered by Craftsy. One that was different, was the Sulky Magical Thread Art Course. There were a total of 10 truly inspirational textile art projects in this course. Each one of which covered a range of techniques. 

Four of the projects covered raw edge applique:

Cat on the Courthouse Steps combined the applique with a pieced background and quilting with decorative machine stitches.
 Serenity Duck Wall Hanging combined the applique with Bargello patchwork, a staggered lower edge and quilted the wall hanging with metallic thread.
Swirly Lace Pear combined the applique with free standing machine embroidered lace, freehand satin stitch monogramming and echo quilting.
Magical Mystery Balloon Ride combined the applique with using a gradient fabric as a background and adding a lot of detail with freehand machine embroidery and decorative machine stitches.


 Two of the projects covered three dimensional elements.

3-D Sunflowers added the three dimensional elements and some textured applique to a pre-printed panel. I didn't have the panel, so combined fabrics from my stash to create a background for my sunflowers.
Floral Fantasy Sculpture used a special stabiliser to shape a floral motif that had been embellished with freehand machine embroidery.

The other projects were:

Butterfly in Flight combined a pieced background with freehand machine embroidery motifs.
Magical Tigers used a pre-printed panel and co-ordinating fabrics to make a themed wall hanging. As you can see in the photo, I didn't have any fabric with tigers on....
Penny Rug Candlemat used the beautiful Sulky Threads to embellish a felt/wool fabric candlemat. I made the violet/purple felt on the black candlemat, the burgundy flowers on the cream candlemat were fabric scraps from a dressmaking project.
Sun's Up Placemat used a specialty quilting ruler and easy piecing to make some pretty placemats that were then quilted with decorative machine stitches and metallic threads.
I had a great time making all of these projects and the teacher certification that I got after all of the projects were submitted was an added bonus.

I was enthusiastic a few weeks ago, when I found out that the same Sulky Educators were running another class for online Teacher Certification. This time the projects are more simple for students to complete and as a consequence, there is less time before the due date. As with the Magical Thread Art course, all projects are presented as .pdf patterns with an accompanying video that takes you through all of the steps to make each project. The educators are very enthusiastic about the projects and each one is accompanied by a trunk show for further inspiration. I think that the enthusiasm of the educators and the trunk show is why I keep subscribing to these lessons. I am familiar with most of the techniques used in the projects, but just love all the inspiration I gain from the videos and the trunk shows.

This week I will be working on my projects for the Sulky Art, Fun and Home online Teacher Certification course. I have selected my fabrics for each project:
I have threads:
Metallic threads:
And stabilisers:
All ready to start my projects...... 


Tuesday 8 August 2017

Play Day - Part 2


In the first part of this tutorial, I showed how to use 2 ½ inch strips from a thick and thin stripe fabric to make an interesting block that looks like it took more than 4 simple strips of fabric to make. After looking at the blocks sitting on my craft table, I decided that they would look their best if they were set on point, one after the other in a runner.


Then, there were the tricky tasks of both choosing a fabric to compliment the blocks and calculating the size to cut the setting triangles. To calculate the sizes for the setting triangles, I enlisted the help of Electric Quilt 7. I could set the size of the pieced blocks and use the computer to calculate the size of the setting triangles. Electric Quilt calculated that I needed to cut one 9 ¼ inch square and cut it on both diagonals for the ends of the runner. I needed to cut two 8 ⅞ inch squares and cut each one on one diagonal to make the setting triangles for the sides of the runner. This was great, but, I wanted to use the lighter strips from the same jelly roll for the background of the runner. Time to put my thinking cap back on….

Some work with a pencil and my quilting ruler, allowed me to calculate that the short sides of each of the corner triangles would be 6 ½ inches. The height of the setting triangles would be 6 ¼ inches.

I stitched three of the lighter strips from the jelly roll, side by side. The height of this strip was 6 ½ inches! My lucky day! Now to work out if the 42 inch length of the pieced section was enough fabric to cut four corner triangles and four side triangles for my runner.

Starting from one end, I marked out the fabric with a temporary marker to check that I could cut all of the pieces. This was how I marked it out (I worked from right to left across my fabric):
          1. Rule a line that is at 90 degrees to the piecing and close to the selvedges.

      2.    Measure 6 ½ inches from the line marked in Step 1 and make a small mark at both raw edges.

     3.    Join the line marked in Step 1 with a diagonal line to one of the marks from Step 2. This is the first corner triangle.

     4.    Measure 6 ½ inches from the marks made in Step 2 and make a small mark at each selvedge.

      5.    Join the left-most end of the line marked in Step 3 with one of the marks made in Step 4. This is the first side triangle.

    6.    Repeat Steps 4 and 5 to make another 3 (total of 4) side triangles.

     7.    Join the two marks at the end of the fourth side triangle with a line that is at 90 degrees to the piecing. This is the second corner triangle.

     8.    Measure 6 ½ inches from the line marked in Step 7 and mark a line that is at 90 degrees to the piecing.

      9.    Join the lower right and upper left edges with a diagonal line. This is the third and fourth corner triangles. 
Yay! It is possible to cut all 8 pieces from the pieced strip.
The photo below shows which edges (with the double strike marks) of the corner and the side triangles that will be stitched to the pieced blocks. 
Carefully cut out all 8 pieces on the marked lines.
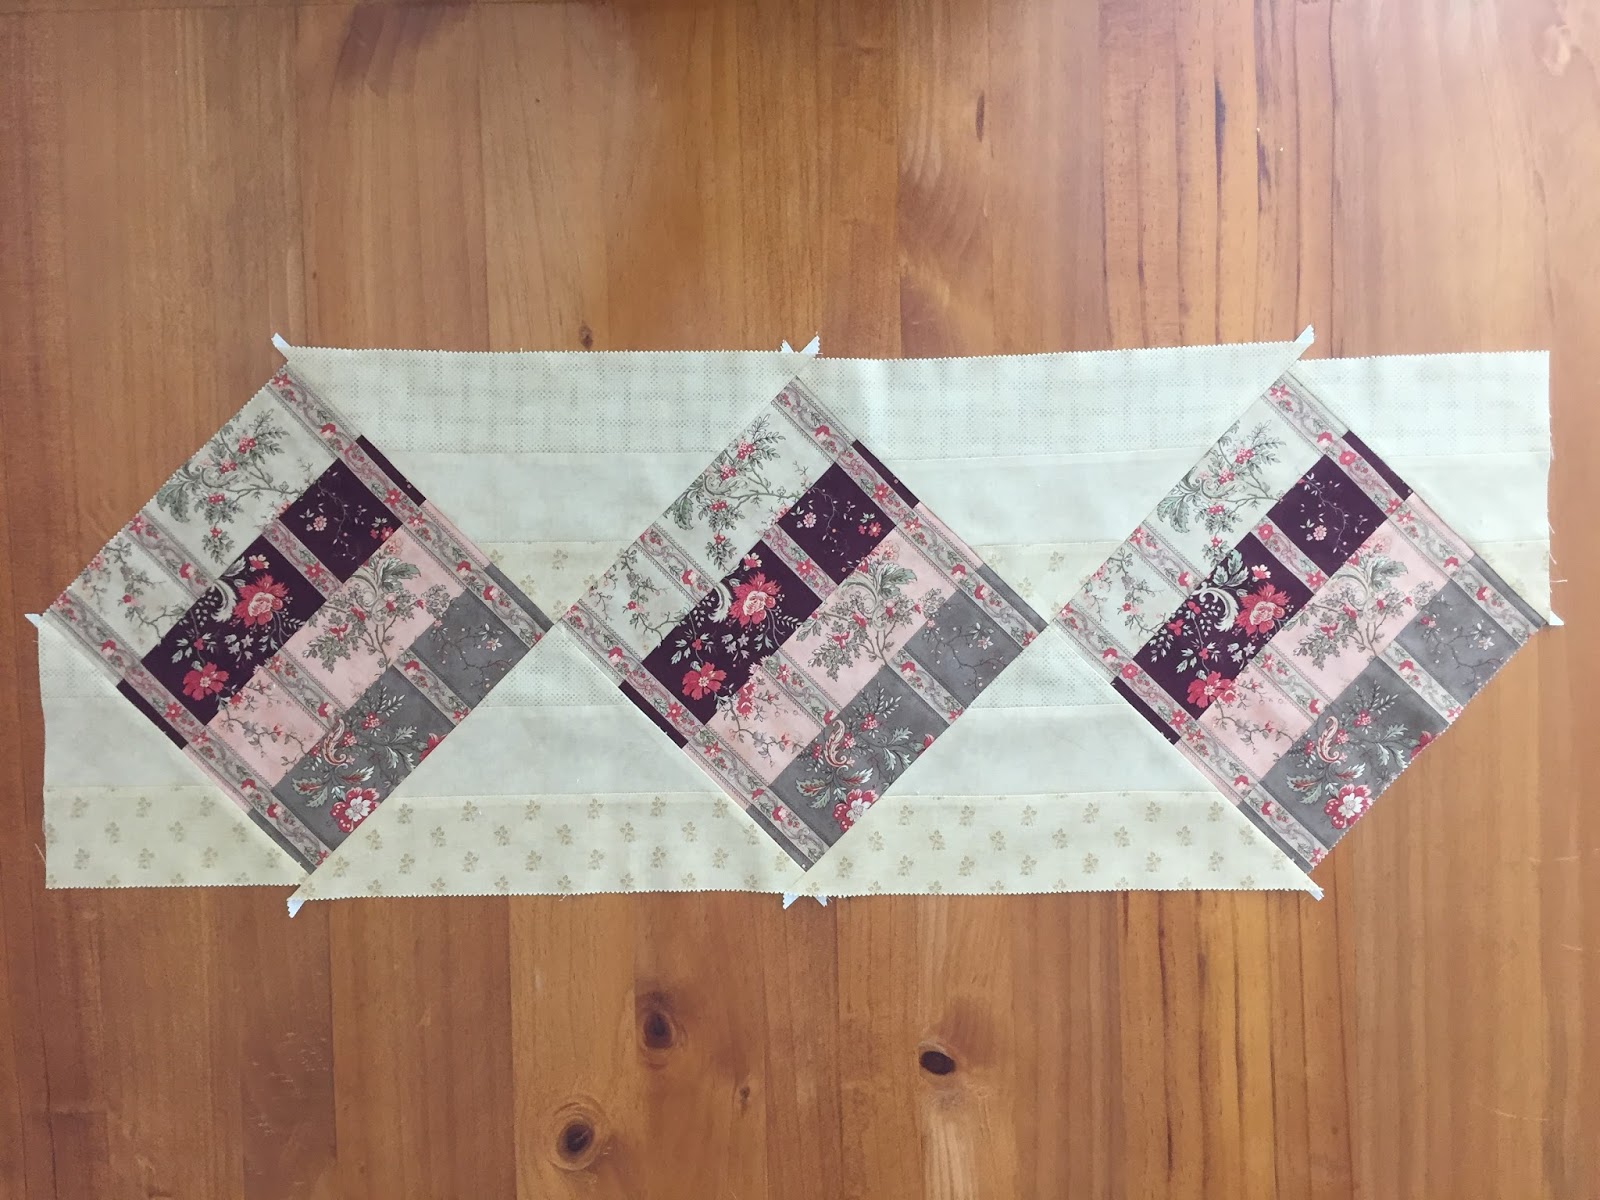
Each setting triangle now needs to be stitched to one of the pieced blocks. The whole runner is simple to put together, just remember that all of the seams are set on the diagonal and that there are no set-in seams (yay!). Lay out the three pieced blocks and fill in the sides with the side triangles and square of the ends with the corner triangles. See the photo below.

Block 1 will have a corner triangle joined to one edge and a side triangle joined to the opposite edge.

Block 2 will have a side triangle joined to two opposite edges.

Block 3 will have a side triangle joined to one edge and a corner triangle joined to the opposite edge.

Set Block 1 and Block 3
Fold the long edge of the corner triangle and mark the centre with a pin.
Fold one edge of Block 1 and mark the centre with a pin.
Place the corner triangle with the right side facing the Block, matching the centre pins and having the raw edges even.
Stitch with a ¼ inch seam.
Press the seam towards the triangle.
Place the side triangle with the right side facing the Block, matching the corner of the short side of the triangle with the corner of the Block and having the raw edges even. This triangle is on the opposite side of the Block to the corner triangle.
Stitch with a ¼ inch seam.
Press the seam towards the triangle.


Block 2
Place one of the side triangles with the right side facing the Block, matching the corner of the short side of the triangle with the corner of the Block and having the raw edges even.
Stitch with a ¼ inch seam.
Press the seam towards the triangle.
Place a second side triangle with the right side facing the Block, matching the corner of the short side of the triangle with the corner of the Block and having the raw edges even. This triangle is on the opposite side of the Block to the first side triangle.
Stitch with a ¼ inch seam.
Press the seam towards the triangle.

Place Block 1 with the right side facing Block 2.
Match the seams of the side triangles and the raw edges.
Pin the two blocks together along the edge.
Stitch with a ¼ inch seam.
Press the seam towards the triangles, clipping the seam allowance to allow it to sit flat.

Place Block 2 with the right side facing Block 3.
Match the seams of the side triangles and the raw edges.
Pin the two blocks together along the edge.
Stitch with a ¼ inch seam.
Press the seam towards the triangles, clipping the seam allowance to allow it to sit flat.
The runner needs to have the last two corner triangles stitched in place.
Fold the long edge of each corner triangle and mark the centre point with a pin.
Fold the remaining edge of Block 1 and mark the centre point with a pin.
Place the corner triangle with the right side facing Block 1, matching the centre pins and having the raw edges even.
Stitch with a ¼ inch seam.
Press the seam towards the corner triangle.
Fold the remaining edge of Block 3 and mark the centre point with a pin.
Place the last corner triangle with the right side facing Block 3, matching the centre pins and having the raw edges even.
Stitch with a ¼ inch seam.
Press the seam towards the corner triangle.

Now, you may notice that the side triangles end a bit past the edges of the corner triangles. This is fine. The side triangles were cut a little larger than needed and we can now trim them to size. In the photo below, I have drawn a line with a marker to show where the side triangles will be trimmed to size.

Place the Jelly Roll Runner on your cutting mat.
Place a long Quilter’s Ruler along the side of the Jelly Roll Runner, checking that the edge of the Quilter’s Ruler is ¼ inch from the point of each of the Pieced Squares.
Trim the excess fabric from the side triangles.

The top of the Jelly Roll Runner is now completed. It can be quilted and finished as is or borders can be added to make it larger and frame the pieced section. Join me again soon as I add borders to frame the runner and explore how to quilt it.